Sunday 18 January 2015

Calculator


Q. How to design a simple working calculator ?

<html>
<head>
<script>
var n1,n2,type
function clk(a)
{
   t=a;
 for(i=0;i<=9;i++)
  {
    if(i==t)
    {
     if(document.hi.t1.value=="")
      {
        document.hi.t1.value=String(t);
      }
     else
      {
       document.hi.t1.value=document.hi.t1.value+String(t);
     }
    }  
   }
}   

function clik(a)
   {
   tp=a; 
n1=parseInt(document.hi.t1.value);
   for(i=0;i<=5;i++)
     {
     
     if(i==tp)
       { 
type=i;
      document.hi.t1.value="";
       }
     }
}

function clp()
{
  n2=parseInt(document.hi.t1.value);
  switch(type)
  {
    case 1:n2=n1+n2;document.hi.t1.value=n2;break;       
    case 2:n2=n1-n2;document.hi.t1.value=n2;break;
    case 3:n2=n1*n2;document.hi.t1.value=n2;break;
    case 4:n2=n1%n2;document.hi.t1.value=n2;break;
    case 5:n2=n1/n2;document.hi.t1.value=n2;break;    
   }
    
}
</script>
</head>
<body>
<Form name="hi">
<center><h3><b>CALCULATOR</b></h3><br><br><br>
<table border=1 cellpadding=11>
<form onReset>
<tr>
      <th colspan=4><input type=textbox  size="25" name=t1>
   </tr>

<tr>
<td><b><input type=reset value="C" onClick="Reset"></b></td>
<td><b><input type=button value="1" onClick="clk(1)"></b></td>
<td><b><input type=button value="2" onClick="clk(2)"></b></td>
<td><b><input type=button value="3" onClick="clk(3)"></b></td>
</tr>
<tr>
<td><b><input type=button value="4" onClick="clk(4)"></b></td>
<td><b><input type=button value="5" onClick="clk(5)"></b></td>
<td><b><input type=button value="6" onClick="clk(6)"></b></td>
<td><b><input type=button value="7" onClick="clk(7)"></b></td>
</tr>
<tr>
<td><b><input type=button value="8" onClick="clk(8)"></b></td>
<td><b><input type=button value="9" onClick="clk(9)"></b></td>
<td><b><input type=button value="0" onClick="clk(0)"></b></td>
<td><b><input type=button value="=" onClick="clp()"></b></td>
</tr>
<tr>
<td><b><input type=button value="+" onClick="clik(1)"></b></td>
<td><b><input type=button value="-" onClick="clik(2)"></b></td>
<td><b><input type=button value="*" onClick="clik(3)"></b></td>
<td><b><input type=button value="%" onClick="clik(4)"></b></td>
</td><tr>
<td colspan=2><b><input type=button value="/" onClick="clik(5)"></b></td>
<td colspan=2><b><input type=button value="Exit" onClick="window.close()"></b></td>
</tr>
</table></form>
</body>
</html>


Print current date and time


Q. Write a program to print current date and time in a text-box.

<html>
<head>
<script>
function f1()
{
  var t=new Date();
  var hour=t.getHours();
  var min=t.getMinutes();
  var sec=t.getSeconds();
  document.hi.t1.value=t;
}
</script>
</head>

<body>
<form Name="hi">
<br><br><center>
<input type="textbox" name="t1"><br><br>
<input type=button value="ENTER" onClick="f1()"></center>
</form></body>
</html>

Billing Machine using Javascript


Q. How to make a billing machine which gives out the bill of the items you have ordered? 

<html>
<head>
<script>
var m;
function pick(F1)
{

  var z=" "
  for(j=0;j<3;j++)
  {
   for(i=0;i<F1.elements[j].length;i++)
{
            if(F1.elements[j][i].selected)
            {

              var y=F1.elements[j].options[i].value;
              z=z+ "\n" +y;
              F1.elements[3].value=z;
            }
       }
  }
  m=z;
}

function total(F1)
{
   var d=0;
   for(j=0;j<3;j++)
   {
        for(i=0;i<F1.elements[j].length;i++)
         {
              if(F1.elements[j][i].selected)
              {
                 var y=F1.elements[j].options[i].value;
                 s=new String(y);
                 var a=s.indexOf(">");
                 var b=s.substring(a+2,a+4);
                 c=parseInt(b);
                 d=d+c;
              }
}
}
   p="Total cost of the selected items= "+d;
   m=m+ "\n" + p;
   F1.elements[3].value=m;

}
function clr(F1)
{
  F1.elements[3].value=" "
}
</script>
</head>

<body>
<h1><font color=blue>Welcome to the World Famous Fast Food Center</font><font color=red> Buffet!</font></h1>
<h3>Select the Menu Items of your choice:</h3>
<form name="F1">
<table border=0>
<tr><th>
Major Dishes :<br>
<select multiple onBlur="pick(this.form)">
          <option value="Mc Burger --> 40" >Mc Burger</option>
          <option value="Fish Fillets --> 70" >Fish Fillets</option>
          <option value="Chicken Burger --> 50">Chicken Burger</option>
          <option value="Veg. Burger --> 25">Veg. Burger</option>
</select multiple></td>

<th>Starters :<br>
<select multiple onBlur="pick(this.form)">
                <option value="French Fries --> 35" >French Fries</option>
                <option value="Nuggets --> 60">Nuggets</option>
                <option value="Hash Browns --> 80">Hash Browns</option>
                <option value="Mc Aloo Tikki --> 25">Mc Aloo Tikki</option>
</select multiple>
</td>
<th valign=top>
Miscellaneous : <br><select onBlur="pick(this.form)">
     <option>Choose your drink</option>
     <option value="Soft drink --> 30">Soft drink</option>
     <option value="Milkshake --> 40">Milkshake</option>
     <option value="Softy --> 30">Softy</option>
</select></td></tr>
<tr>
<th colspan=3>
The items selected from the menu are:<br>
<textArea cols="35" rows="15"></TextArea><br><br>
<input type=button value="Total Cost" onClick=total(this.form)>&nbsp&nbsp
<input type=reset value="Clear"></center></td>
</body>
</html>

Saturday 17 January 2015

Table using Javascript


Q. Write a program to design a table and enter two numbers each of five students and when we click button "Result",it will give total marks and percentage of each student.

<html>
<head>
<script>
function f1()
{
   t1=parseInt(document.ff.t1.value)
   t2=parseInt(document.ff.t2.value)
   t3=parseInt(document.ff.t3.value)
   t4=parseInt(document.ff.t4.value)
   t5=parseInt(document.ff.t5.value)
   t6=parseInt(document.ff.t6.value)
   t7=parseInt(document.ff.t7.value)
   t8=parseInt(document.ff.t8.value)
   t9=parseInt(document.ff.t9.value)
   t10=parseInt(document.ff.t10.value)
  tc1=t1+t2
  tc2=t3+t4
  tc3=t5+t6  
  tc4=t7+t8 
  tc5=t9+t10 
  to1=(t1+t2)/2
  to2=(t3+t4)/2
  to3=(t5+t6)/2
  to4=(t7+t8)/2
  to5=(t9+t10)/2
  document.ff.tt1.value=tc1
  document.ff.tt2.value=tc2
  document.ff.tt3.value=tc3
  document.ff.tt4.value=tc4
  document.ff.tt5.value=tc5
  document.ff.tr1.value=to1
  document.ff.tr2.value=to2
  document.ff.tr3.value=to3
  document.ff.tr4.value=to4
  document.ff.tr5.value=to5

}
</script>
</head>
<body>
<form name=ff>
<center><h1><b>RESULT</b></h1><br><table border=2 cellpadding=10>
 <tr>
    <th>S.No.
    <th>Name
    <th>DCAP 1
    <th>DCAP 2
    <th>Total
    <th>Percent
  </tr>
   <tr>
      <td>1
      <td>Neha
      <td><input type=textbox name=t1>
      <td><input type=textbox name=t2>
      <td><input type=textbox name=tt1>
      <td><input type=textbox name=tr1>
   </tr>
   <tr>
     <td>2
     <td>Amit
     <td><input type=textbox name=t3>
     <td><input type=textbox name=t4>
     <td><input type=textbox name=tt2>
     <td><input type=textbox name=tr2>
   </tr>
    <tr>
       <td>3
       <td>Rahul
       <td><input type=textbox name=t5>
       <td><input type=textbox name=t6>
       <td><input type=textbox name=tt3>
       <td><input type=textbox name=tr3>
    </tr>
     <tr>
       <td>4
       <td>Rajat
       <td><input type=textbox name=t7>
       <td><input type=textbox name=t8>
       <td><input type=textbox name=tt4>
       <td><input type=textbox name=tr4>
      </tr>
     <tr>
         <td>5
         <td>Lalit
         <td><input type=textbox name=t9>
         <td><input type=textbox name=t10>
         <td><input type=textbox name=tt5>
         <td><input type=textbox name=tr5>
     </tr>
</table><br>

  <input type=button value=Result onClick="f1()"></center>
</body>
</html>  
                    

Javascript programming


Q. Write a program to enter two numbers from user and on clicking "Result", it will give the percentage of two numbers along with the image on a different web page.

<html>
<head>
<script>
function f1()
{
t1=parseInt(document.ff.t1.value)
t2=parseInt(document.ff.t2.value)
t=t1+t2
tr=(t1+t2)/2
 document.write("<img src=1.jpg height=100 width=100></img><br>Result 2015<br>"+"DCAP I:"+t1+"<br>DCAP II:"+t2+"<br>Total: "+t+"<br>Percentage: "+tr")
}
</script>
</head>

<body>
<form name=ff>
<marquee behavior=scroll><center><h1>WEB DESIGNING</h1></marquee><br>
DCAP1&nbsp&nbsp&nbsp<input type=textbox name=t1><br><br>
DCAP2&nbsp&nbsp&nbsp<input type=textbox name=t2><br><br>
<input type=button value=Result onClick="f1()"></center><br>
</form>
</body>
</html>


How to prompt your site


<html>
<head>
<script>
function f1()
{
v1= prompt("Enter Your Name :")
document.write("<center><h1>Hi "+v1+" welcome to JAVASCRIPT!!!</h1></center>")
}
</script>
</head>
<body onLoad="f1()">

</body>
</html>


Simple javascript program


Q. When you click the button "OK", it will display a message "Welcome to Javascript" and when you click other buttons,the background will be in that colour.

<html>
<head>
<script>
function f1()
{
alert("Welcome to Javascript")
}
function f2()
{
document.bgColor="red"
}
function f3()
{
document.bgColor="blue"
}
function f4()
{
document.bgColor="green"
}
</script>
</head>
<body><br><br><br><center>
<input type=button value=OK onClick="f1()"><br><br><br>
<input type=button value=Red onClick="f2()">&nbsp&nbsp&nbsp&nbsp
<input type=button value=Blue onClick="f3()">&nbsp&nbsp&nbsp&nbsp
<input type=button value=Green onClick="f4()"></center><br>
</body>
</html>


Event Handler II


  • onReset: An onReset event handler executes Javascript code when the user resets a form by clicking on the reset button.
For example:


<html>
<head><title>Example of onReset Event Handler</title></head>
<body>
<h3>Example of onReset Event Handler</h3>
Please type something in the textbox and press the reset button:<br>
<form onReset="alert('This will reset the form!')" >
<input type="text">
<input type="reset" value="Reset form">
</form>
</body>
</html>   

In the above example,when you push the button "Reset form" after typing something,the alert method displays the message, "This will reset the form!".

  • onSelect: An onSelect event handler executes Javascript when the user selects some of the text or texture field.

For example:

<html>
<head><title>Example of onSelect Event Handler</title></head>
<body>
<h3>Example of onSelect Event Handler</h3>
Select the text from the text box:<br>
<form>
<input type=textbox value="Select this" onSelect="alert('This is an example of onSelect !!')">
</form>
</body>
</html>  

In the above example,when you try to select the text or part of the text,the alert method display the message, "This is an example of onSelect!!".

  • onSubmit: An onSubmit event handler calls Javascript code when the form is submitted.
For example:

<html>

<head><title>example of onSubmit Event Handler </title></head>

<body>

<h3>Example of onSubmit Event Handler</h3>

Type your name and press the button<br>

<form name="myform" onSubmit="alert('Thank you' + myform.data.value + '!')">

<input type="text" name="data">

<input type="Submit" value="Submit this form">

</form> </body> </html> 

In this example,the onSubmit event handler calls an alert( ) function when the button "Submit this form" is pressed.

  • onUnLoad: An onUnLoad event handler calls Javascript code when a document is exited.

For example:

<html> <head>

<title>onUnload Example</title>

<script>

function goodbye() {

  alert("Thanks for visiting!");  }

</script> </head>

<body onUnLoad="goodbye()">

<h3>Example of onUnload Event Handler</h3>

Look what happens when you try to leave this page...

</body> </html>   

In this example,the onUnLoad event handler calls the goodbye( ) function as user exits a document.

NOTE: You can also call Javascript code via explicit event handler call. For example, say you have a function called myfunction( ). You could call this function like this:
   document.form.mybutton.onClick= myfunction

Notice that you don't need to put the ( ) after the function and also the event handler has to be spelled out in lowercase. 


Event Handlers


  • onError: An onError event handler executes Javascript code when an error occurs while loading a document or an image. With onError event now you can turn off the standard Javascript messages and have your own function that will trace all the error in the script. To disable all the standard Javascript error messages,all you need to do is to set window.onError = null. To call a function when an error occurs all you need to do is 
                                                     onError= "myerrorfunction( )"       

For example:


<html><head>

<title>Example of onError Event Handler</title>

<script>  windows.onError = ErrorSetting;

var e_msg=" "; 

var e_file=" ";

 var e_line=" ";

document.form[8].value="myButton";

function Errorsetting (msg,file loc,line no){

  e_msg= msg;

  e_file= file_loc;

   e_line= line_no;

 return true; }

function display(){

  var error_d="Error in file" + e_file + "\nline number" + e_line + "\nmessage:" + e_msg;

  alert("Error Window:\n" + error_d); 

</script>

</head>

<body> <h3>Examples of onError Event Handler</h3>

<form>

<input type=button value="Show the error" onClick="display()"> </form>

</body></html>   

Notice that the function ErrorSetting( ) takes three arguments i.e. message text, URL and line number of the error line. So all I did was to invoke the function when an error occurred and set these values to different variables. Finally,I displayed the values via an alert method.

NOTE: If you set the function ErrorSetting( ) to false,the standard dialog will be seen.

  • onFocus: An onFocus event handler executes Javascript code when input focus enters the field either by tabbing in or by clicking but not selecting input from the field. For windows,frames and framesets,the event handler executes Javascript code when the window gets focused. In windows,you need to specify the event handler in the <body> attribute such as
<body bgcolor="#FFFFFF" onFocus="document.bgcolor= '#000000' ">

NOTE: On a windows platform,the onFocus event handler does not work with <frameset>.

For example:
<html>
<head>
<title>Example of onFocus Event handler</title>
</head>
<body>
<h3>Example of onFocus Event Handler</h3>
Click your mouse in the text box:<br>
<form>
<input type=textbox onFocus='alert("You focused in the textbox!!")'>
</form>
</body>
</html>

In the above example,when you put your mouse on the textbox, an alert( ) function display a message.   

  • onLoad: An onLoad event occurs when a window or image finished loading. For windows,this event handler is specified in the <body> attribute of the window. In an images,the event handler will execute handler text when the image is loaded.Such as
  <img src="image/object.jpg" name="jsobjects" onLoad="alert("You loaded my image")">

For example:
<html>
<head>
<title>Example of onLoad Event handler</title>
<script>
function hello()
{
  alert("Hello there...\n\nThis is an example of onLoad");
}
</script>
</head>
<body onLoad="hello()">
<h3>Example of onLoad Event Handler</h3>
</body>
</html> 

The example shows how the function hello( ) is called by using the onLoad event handler.

  • onMouseOut: Javascript  code is called when the mouse leaves a specific link or an object or area from outside that object or area. For area object,the event handler is specified with the <area> tag.
For example:

<html>

<head><title>Example of onMouseout Event Handler</title>
</head>
<body>
<h3>Example of onMouseOut Event Handler</h3>
<a href="javascript: void('');" onMouseOut="windows.status='you left the link here!'; return true;"></a>
</body>
</html>

Put your cursor over <a></a> and then take the mouse pointer away.

In the above example,after pointing your mouse and leaving the link,the text "You left the link!" appears on your windows status bar.

  • onMouseOver: Javascript code is called when the mouse is placed over a specific link or an object or area from outside that object or area. For area object,the event handler is specified with the <area> tag.Such as
<map name= "mymap"> <area name="First Area" co-ords="0,0,49,25" href="mylink.html" onMouseOver="self.status="This will take you to my link",return true"> </map>

For example:
<html>
<head>
<title>Example of onMouseOver Event Handler</title>
</head>
<body>
<h3>Example of onMouseOver Event Handler</h3>
Put your cursor over
<a href="javascript:void();" onMouseOver="windows.status ='Hello! How are you?'; return true;"></a>
and look at the status bar(usually at the bottom of your browser window)
</body>
</html>

In the above example,when you point your cursor to the link,the text "Hello!How are you?" appears on your windows status bar. 


Friday 16 January 2015


Event Handlers:

  • onAbort: An onAbort event handler executes Javascript code when the user aborts loading an images.

For example:
<html>
<head>
<title>Example of onAbort</title>
</head>
<body>
<h3>Example of onAbort Event Handler</h3>
<b>Stop the loading of this image and see what happens</b><p>
<img src="image.jpg" onAbort="alert('You stopped the loading the image')">
</body>
</html>

Here an alert( ) method is called using the onAbort event handler when the user aborts loading the image.

  • onBlur: An onBlur event handler executes Javascript code when input focus leaves the field of a text,textarea or a select option.For windows,frames and frameset, the event handler executes Javascript code when the window loses focus.In window, you need to specify the event handler in the <body> attribute.Such as

<body bgcolor='#FFFFFF' onBlur="document.bgcolor"='#0000000'> 
NOTE: On a windows platform, the onBlur event does not work with <frameset>.

For example:
<html>
<head>
<title>Example of onBlur Event Handler</title>
<script>
function validate (value)
{
   if(value < 0) 
  alert("Please input a value that is greater or equal to 0");
}
</script>
</head>
<body>
<h3>Example of onBlur Event Handler</h3>
Try inputting a value less than zero<br>
<form>

<input type="text" onBlur="validate(this.value)">
</form>
</body>
</html> 
               
 In this example, 'data' is a text field,when a user attempts to leave the field , the onBlur event handler calls the valid( ) function to confirm that 'data' has a legal value.Note that the keyword 'this' is used to refer to the current object.


  • onChange: The onChange event handler executes javascript code when input focus exits the field after the user modifies its text.

For example:
<html>
<head>
<title>Example of Change Event Handler</title>
<script>
function valid (input)
{
   alert("You have changed the value from 10 to " + input)
}
</script>
</head>
<body>
<h3>Example of onChange Event Handler</h3>
Try changing the value from 10 to something else:-<br>
<form>
<input type="text" value="10" onChange="valid(this.value)">
</form>
</body>
</html>

In this example,'data' is a text field,when a user attempt to leave the field after the change of the original values, the onChange event handler calls the valid( ) function which alerts the user about the value that has been inputted.


  • onClick:  In an onClick event handler, Javascript function is called when an object in a button(regular,radio,reset and submit) is clicked,a link is pushed, a checkbox is checked or an image map area is selected except for the regular button and the area, the onClick event handler can return false to cancel the action such as 

<input type="submit" name="mySubmit" value="submit" onClick="return confirm('Are you sure you want to submit the form?')">
NOTE: On windows platform, the onClick event handler does not work with reset button.

For example:
<html>
<head>
<title>Example of onClick Event Handler</title>
<script>
function valid(form)
{
    var input=form.data.value
    alert("Hello " + input + " ! Welcome...")
}
</script>
</head>
<body>
<h3>Example of onClick Event Handler</h3>
Click on the button after inputting your name into the text box:<br>

<form>
<input type="text" name="data">
<input type=button value=Click Here onClick="valid(this.form)">
</form>
</body>
</html> 

   In this example, when the user clicks the button "Click Here", the onClick event handler calls the function valid( ). 


Javascript

Q.What is Javascript?

= Javascript is a light weight,interpreted programming language with object-oriented capabilities that allows you to build interactively into otherwise static HTML pages.
The general purpose core of the language has been embedded in Netscape,Internet Explorer and other web browsers.

Q.What are the advantages of Javascript?

=
  1. It is a light weight,interpreted programming language.
  2. Designed for creating network-centric applications.
  3. Complementary to and integrated with Java.
  4. Complementary to and integrated with HTML.
  5. Open and cross platform.

EVENT HANDLERS:

An event handler executes a segment of code based on certain events occurring within the application such as onLoad,onClick. Javascript event handlers can be divided into two parts:
  • Interactive Event Handlers.
  • Non-Interactive Event Handlers.
An interactive event handler is the one that depends on the user interactivity with the form or document.For example:
onMouseOver is an interactive event handler because it depends on the users action with the mouse. On the other hand non-interactive event handler would be onLoad because this event handler would automatically execute Javascript code without the users interactivity.

Here are all the event handlers available in Javascript.

   Event Handler            Used with
  1. onAbort                  image
  2. onBlur                    select,text,text area.
  3. onChange               select,text,text area.
  4. onClick                   button,checkbox,radio,link,reset,submit,area.
  5. onError                   image.
  6. onFocus                  select,text,text area.
  7. onLoad                   windows,image.
  8. onMouseOut          link,area.
  9. onMouseOver        link,area.
  10. onSelect                 text, text area.
  11. onSubmit               form
  12. onUnLoad             window 


Frameset


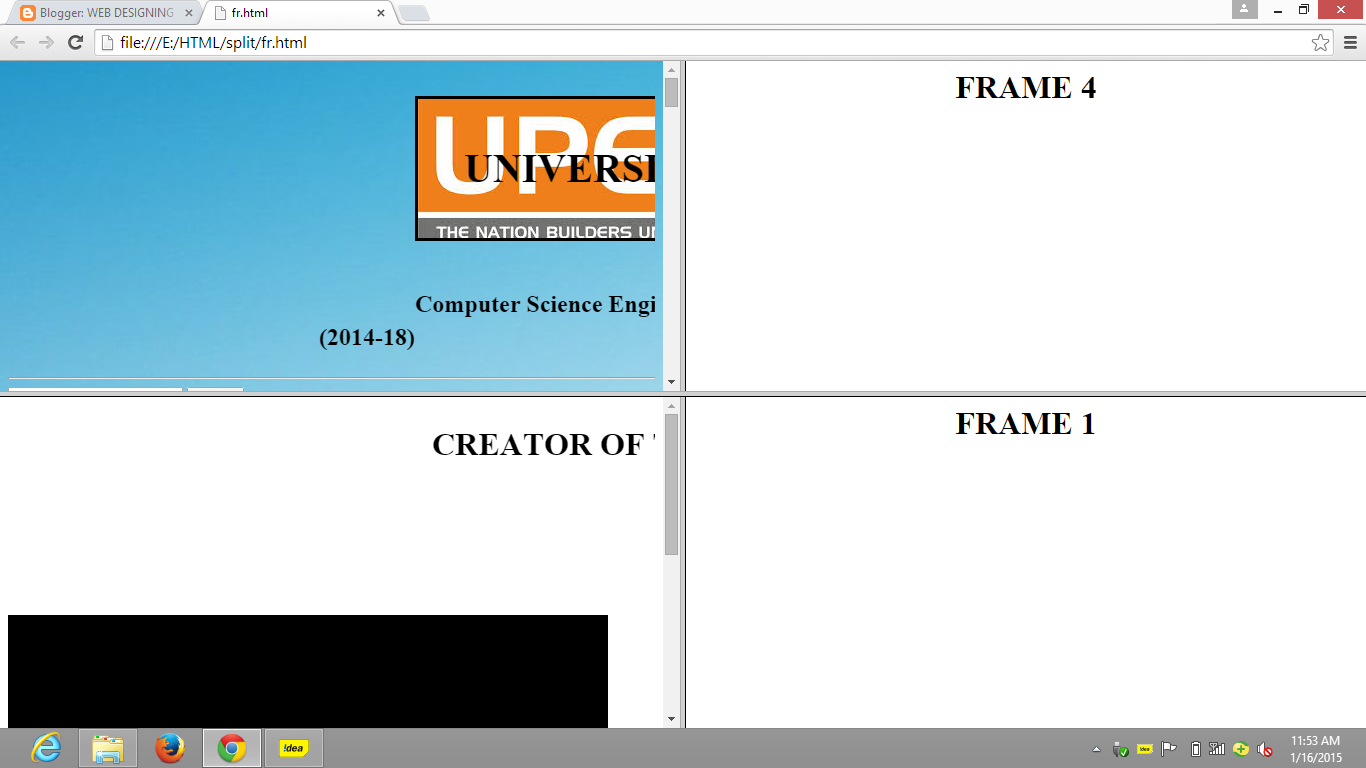
Frameset means splitting the screen into number of frames or screens.It is helpful in creating different websites such as news website,share trading etc.


<html>
<head>
<frameset>
    <frameset rows=*,*>
      <frameset cols=*,*>
       <frame src="index.html">
       <frame src="b2.html"> 
       </frameset>
     <frameset cols=*,*>
      <frame src="b1.html">
      <frame src="b3.html">
      </frameset>
    </frameset>
  </frameset>
</head>
</html>


NOTE: We can use percentage instead of  *;percentage means the percentage of  screen occupied by each frame.


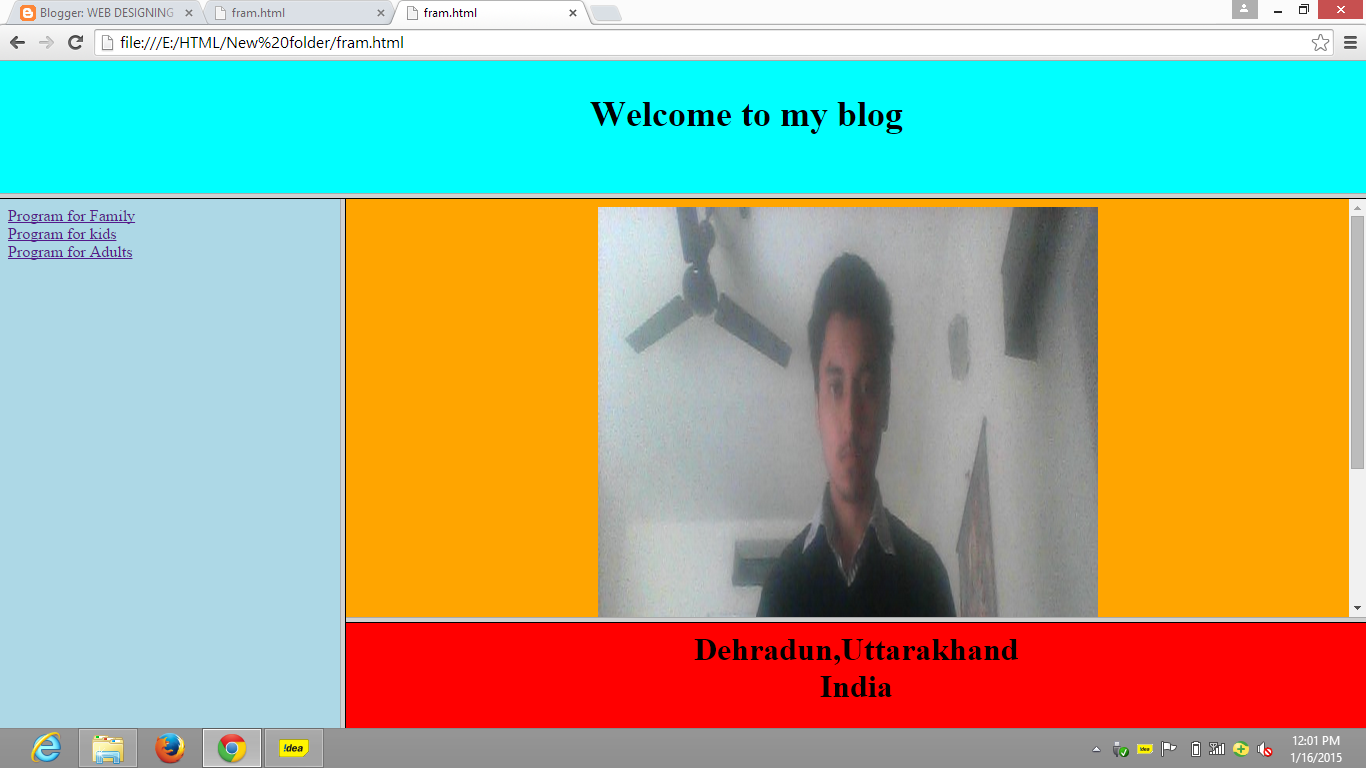
In this example I have used Target-which is used when we click on some link in one frame and that file or page opens in another frame.  

Coding of main page:
<html>
<head>
  <frameset>
       <frameset rows=*,4* noresize>
          <frameset cols=* noresize>
           <frame src="welcome.html" noresize>
           </frameset>
       <frameset cols=*,3* noresize>
          <frame src="links.html" noresize>
          <frameset rows=4*,* noresize>
           <frameset cols=* noresize>
            <frame src="" name="id" noresize>
            </frameset>
            <frameset cols=* noresize>
            <frame src="sym.html" noresize>
            </frameset>
 </frameset>
</frameset>

</frameset>
</frameset>
</head>
</html>

Coding for adding images to frameset:
<html>
<head></head>
<body bgcolor=#FFA500>
 <center><img src="C:\Users\500040364\Pictures\Camera Roll\picture010.jpg" height=600 width=500></a></center><br>
 <a href="links.html"></a>
</body>
</html>


<html>
<head></head>
<body>
   <center>
    <a href="nest.html">BACK</a>
    <img src="C:\Users\500040364\Pictures\Camera Roll\picture010.jpg" height=1000 width=1000></center>
</body>
</html>


<html>
<head></head>
<body bgcolor=#0000FF>
<center><img src="C:\Users\500040364\Downloads\apple.jpg" height=600 width=500></center><br>
<a href="links.html"></a>
</body>
</html>

Coding for linking the frameset:
<html>
<head></head>
<body bgcolor=#ADD8E6>
<a href="NGO.html" target=id>Program for Family</a><br>
<a href="kids.html" target=id>Program for kids</a><br>
<a href="adults.html" target=id>Program for Adults</a><br>
</body>
</html>


<html>
<head></head>
<body bgcolor=#00FF00>
 <center><img src="C:\Users\500040364\Pictures\Camera Roll\picture013.jpg" height=600 width=500></center><br>
 <a href="links.html"></a><br>
 <center><img src="C:\Users\500040364\Downloads\apple.jpg" height=600 width=500></center><br>
<a href="links.html"></a><br>
 <center><img src="C:\Users\500040364\Downloads\apple.jpg" height=600 width=500></center><br>
<a href="links.html"></a>
</body>
</html>


Coding of other frameset:
<html>
<head></head>
<body bgcolor=#00FFFF>
<marquee behavior=scroll><font size=4><center><h1><b>Welcome to my blog</b></h1></center></font size></marquee>
</body>
</html>


<html>
<head></head>
<body bgcolor=red>
 <center><h1>Dehradun,Uttarakhand<br>India</h1></center>
  </body>
</html>


This is all in HTML,hope you liked it and i will start Javascript from next time.  

Thursday 15 January 2015

FORMS


INTRODUCING FORMS:

Start by looking at an example of forms.You can look at Google homepage, which contains two kinds of form controls:
➤➤ Text input: Where you enter your search term.
➤➤ Submit buttons: Send the form to the server. There are two on this form: You can see the
words Google Search written on the first one and I’m Feeling Lucky on the second.

The form has many more types of controls:
➤➤ Select boxes: Sometimes referred to as drop-down lists, to choose from a list of provided answers.
➤➤ Radio buttons: Such as the ones in the top-right corner with Yes or No options. When you
have a group of radio buttons, you can pick only one response.
➤➤ Check boxes: Such as the ones at the bottom of the screenshot indicating how you can be
contacted (by e‑mail, post, or phone). When you have a group of check boxes, you can pick
more than one response.
➤➤ Text inputs: To enter a variety of information, or in this case a date of birth and registration
number.

Now have some practical look at these forms through some examples:


<html>
<head></head>
<body background="C:\Users\500040364\Downloads\1871427.jpg">
  <center><b><u>APPLICATION FORM</u></b><br>
   <h1>Electronic Service and Training Center</h1></center><br>
  <OL type="1">
     <li><b>NAME</b>:<b>[Mr/Miss/Mrs]</b>:-&nbsp
        <input type=Textbox value="First name" name=" ">&nbsp&nbsp
        <input type=Textbox value="Middle name" name=" ">&nbsp&nbsp
        <input type=Textbox value="Last name" name=" "></li><br>
      
     <li><b>FATHER'S NAME</b>:-&nbsp&nbsp&nbsp&nbsp&nbsp&nbsp
         <input type=Textbox value="First name" name=" ">&nbsp&nbsp
         <input type=Textbox value="Middle name" name=" ">&nbsp&nbsp
         <input type=Textbox value="Last name" name=" "></li><br>

   <li><b>ADDRESS</b>:-&nbsp&nbsp&nbsp
         <input type=Textbox name=" "></li><br>
  
    <li><b>PIN CODE</b>:-&nbsp&nbsp&nbsp
       <input type=Textbox name=" "></li><br>
  
   <li><b>MOB NO.</b>:-&nbsp&nbsp&nbsp
       <input type=Textbox name=" ">&nbsp&nbsp&nbsp
       <input type=Textbox value="STD CODE" name=" "></li><br>

     <li><b>DATE OF BIRTH</b>:-&nbsp&nbsp
        <input type=Textbox name=" "></li><br>     
  
  <h2><b>CATEGORY</b></h2>
    SC <input type=radio name=" ">&nbsp&nbsp&nbsp 
    ST <input type=radio name=" ">&nbsp&nbsp&nbsp
   OBC <input type=radio name=" ">&nbsp&nbsp&nbsp
   GEN <input type=radio name=" "><br><br>
   
   <li><b>EDUCATION QUALIFICATION</b>:-<br>
     <table border=2 cellpadding=5>
          <tr>
            <th>S. NO.
            <th>EXAM
            <th>BOARD
            <th>UNIVERSITY
            <th>YEAR
            <th>SUB
          </tr>
          <tr>
             <td><input type=Textbox name=" ">
             <td><input type=Textbox name=" "> 
             <td><input type=Textbox name=" "> 
             <td><input type=Textbox name=" ">
             <td><input type=Textbox name=" ">
             <td><input type=Textbox name=" ">
           </tr>
            <tr>
              <td><input type=Textbox name=" ">
              <td><input type=Textbox name=" ">
              <td><input type=Textbox name=" ">
              <td><input type=Textbox name=" ">
              <td><input type=Textbox name=" ">
              <td><input type=Textbox name=" ">
            </tr>    
             <tr>
               <td><input type=Textbox name=" "> 
               <td><input type=Textbox name=" ">
               <td><input type=Textbox name=" ">
               <td><input type=Textbox name=" ">
               <td><input type=Textbox name=" ">
               <td><input type=Textbox name=" ">
              </tr></table>
          </li><br>
    
    <li><b>COURSE OPTED</b>:-<br>
        NAME: <input type=Textbox name=" "><br><br>
        CODE: <input type=Textbox name=" "><br><br>
        DATE: <input type=Textbox name=" "><br><br>
        D.O.J: <input type=Textbox name=" "></li><br>
          
      <li><b>PREFERENCE FOR THE SLOT</b>:-<br>
          MORNING <input type=radio name=" ">&nbsp&nbsp&nbsp&nbsp&nbsp&nbsp
          EVENING <input type=radio name=" "><br></li><br>

  </OL>   
 <center><input type=button value=SUBMIT>&nbsp&nbsp&nbsp<input type=button value=RESET>&nbsp&nbsp&nbsp<input type=button value=EXIT>
 </center>   
</body>
</html>  


<html>
<head></head>
<body>
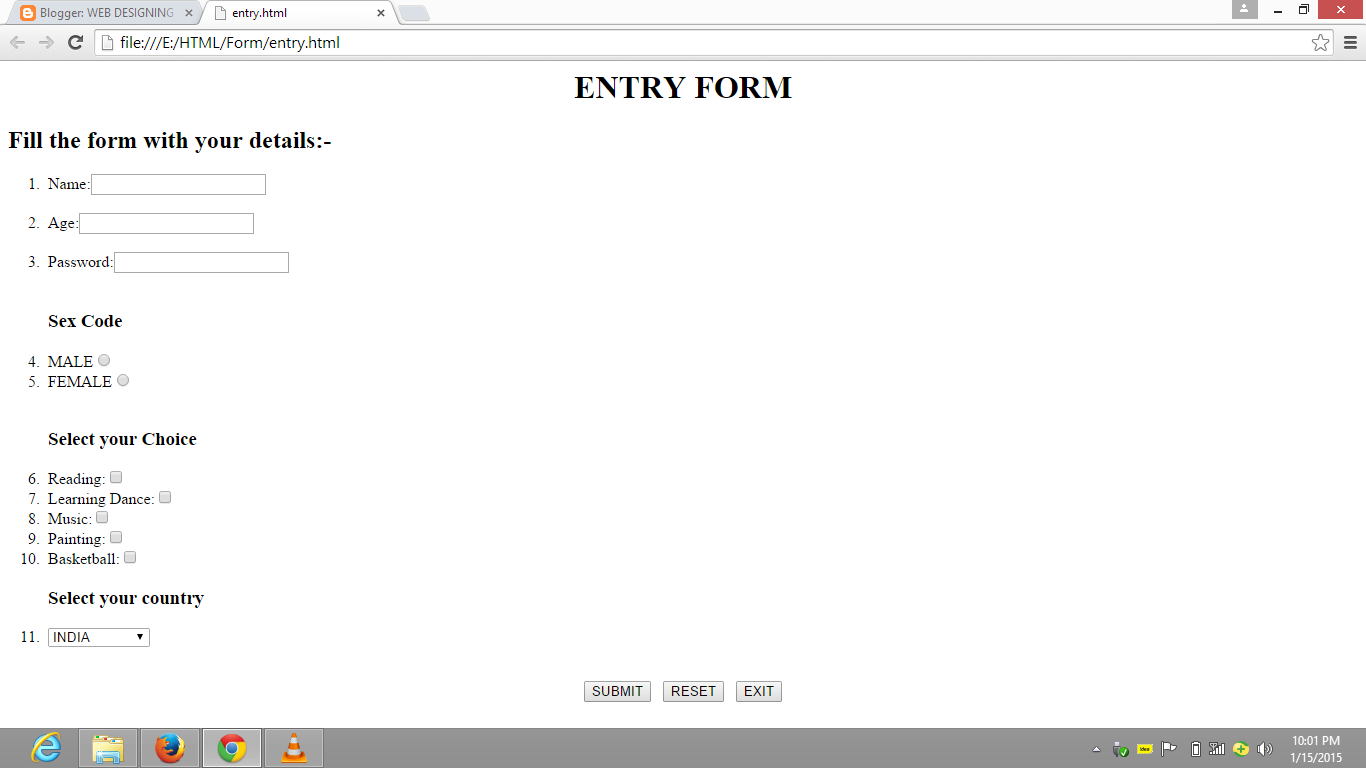
   <center><h1><b>ENTRY FORM</b></h1></center>
  <h2>Fill the form with your details:-</h2> 
  <OL type="1">
      <li>Name:<input type=Textbox name=" "></li><br>
      <li>Age:<input type=Textbox name=" "></li><br>
      <li>Password:<input type=Textbox name=" "></li><br>
      <h3>Sex Code</h3>
    <li>MALE<input type=radio name=" "></li>
    <li>FEMALE<input type=radio name=" "></li><br> 
     <h3>Select your Choice</h3>
    <li>Reading:<input type=checkbox name=" "></li>
    <li>Learning Dance:<input type=checkbox name=" "></li>
    <li>Music:<input type=checkbox name=" "></li>
    <li>Painting:<input type=checkbox name=" "</li>
    <li>Basketball:<input type=checkbox name=" "></li>
   
    <h3>Select your country</h3>
    <li><Select>
        <option>INDIA</option>
        <option>AUSTRALIA</option>
        <option>ENGLAND</option></select></li>
  </OL><br>
   <center><input type=button value=SUBMIT>&nbsp&nbsp&nbsp<input type=button value=RESET>&nbsp&nbsp&nbsp<input type=button value=EXIT></center>
 </body>
</html>


<html>
<head></head>
<body>
  <h1><center><b><u>SUBMISSION FORM</u></b></center></h1>
  <OL type="1">
    <li>ENTER YOUR COMMENT:-<br>
        <TextArea cols="50" row="70"></TextArea></li><br>

    <li>ENTER YOUR CITY:-<br>
     <select>
       <option>New Delhi</option>
       <option>Dehradun</option>
       <option>Lucknow</option></select></li><br>

    <li>ENTER YOUR PINCODE:-<br>
      <select>
        <option>248001</option>
        <option>248008</option>
        <option>248007</option></select></li>
  </OL>
<center><input type=button value="SUBMIT">&nbsp&nbsp&nbsp<input type=button value="RESET">&nbsp&nbsp&nbsp<input type=button value="EXIT"></center>
</body>
</html>


By now,you must be having a basic knowledge of FORMS and how to implement them,


Monday 12 January 2015

Now, in this page we will learn about tables,how to design a table in a webpage.

TABLES:

Tables display information in rows and columns; they are commonly used to display all manner of data that fits in a grid such as train schedules, television listings, financial reports, and sports results. In this topic, you learn when to use tables and the markup that you need to create them.To begin this topic, you look at some examples of tables and then quickly move to the basic elements used to create them. Having learned the basics, you can then learn some of the more advanced features of tables such as adding captions and headings and achieving more complicated table layouts. The topic ends with a discussion of accessibility issues that relate to tables, because you must understand how a screen reader would read the contents of a table for users with visual impairments.

HOW TO CREATE A TABLE IN A WEBSITE:

You create a table in HTML using the <table> element. Inside the <table> element, the table is
written out row by row. A row is contained inside a <tr> element, which stands for table row. Each
cell is then written inside the row element using a <td> element, which stands for table data.
For Example:
<table border=2 cellspacing=2 cellpadding=5>
<tr>
    <td></td>
    <td></td>
    <td></td>
    <td></td>
</tr>
<tr>
   <th></th>
   <th></th>
   <th></th>
   <th></th>
</tr>
< tr>
    <th></th>
    <th></th>
    <th></th>
     <th></th>
</tr>
</table>

BASIC TABLE ELEMENTS AND ATTRIBUTES:

The <table> Element Creates a Table
The <table> element is the containing element for all tables. It can carry the following attributes:
➤➤ All the universal attributes
➤➤ Basic event attributes for scripting

The <tr> Element Contains Table Rows
The <tr> element contains each row in a table. Anything appearing within a <tr> element should
appear on the same row.

The <td> and <th> Elements Represent Table Cells
Every cell in a table is represented by either a <td> element for cells containing table data or a <th>
element for cells containing table headings.By default, the contents of a <th> element usually display in a bold font, horizontally aligned in the center of the cell. The content of a <td> element, meanwhile, usually displays left-aligned and not in bold (unless otherwise indicated by CSS or another element).The <td> and <th> elements can both carry the same set of attributes, and the attribute applies only to that one cell carrying it. Any effects these attributes have override settings for the table as a whole or any containing element (such as a row).In addition to the universal attributes and the basic event attributes, the <td> and <th> elements can also carry the following attributes:
colspan, headers, rowspan.
<th> elements can also carry the scope attribute.

The colspan Attribute
Use the colspan attribute when a cell should span across more than one column. The value of the
attribute specifies how many columns of the table a cell spans across.
colspan="2"
The headers Attribute
The headers attribute indicates which headers correspond to that cell. The value of the attribute is a
space-separated list of the header cells’ id attribute values:
headers="income q1"
The main purpose of this attribute is to support voice browsers. When a table is read to you, it can
be hard to keep track of which row and column you are on; therefore, the header attribute reminds
users which row and column the current cell’s data belongs to.
The rowspan Attribute
The rowspan attribute specifies the number of rows of the table a cell spans across, the value of
the attribute being the number of rows the cell stretches across. 
rowspan="2"
The scope Attribute
You can use the scope attribute to indicate which cells the current header provides a label or header
information for. You can use it instead of the headers attribute in basic tables, but it does not have
much support.
scope="range"

        Value                                                                                                   Purpose
  1. row---------------------------------------------Cell contains header information for that row.
  2. col----------------------------------------------Cell contains header information for that column.
  3. rowgroup-------------------------------------- Cell contains header information for that                                                                                           rowgroup (a group of cells in a row created using                                                                            the <thead>, <tbody>, or <tfoot> elements).
  4. colgroup---------------------------------------Cell contains header information for that colgroup                                                                            (a group of columns created using the <col> or                                                                               <colgroup> element).
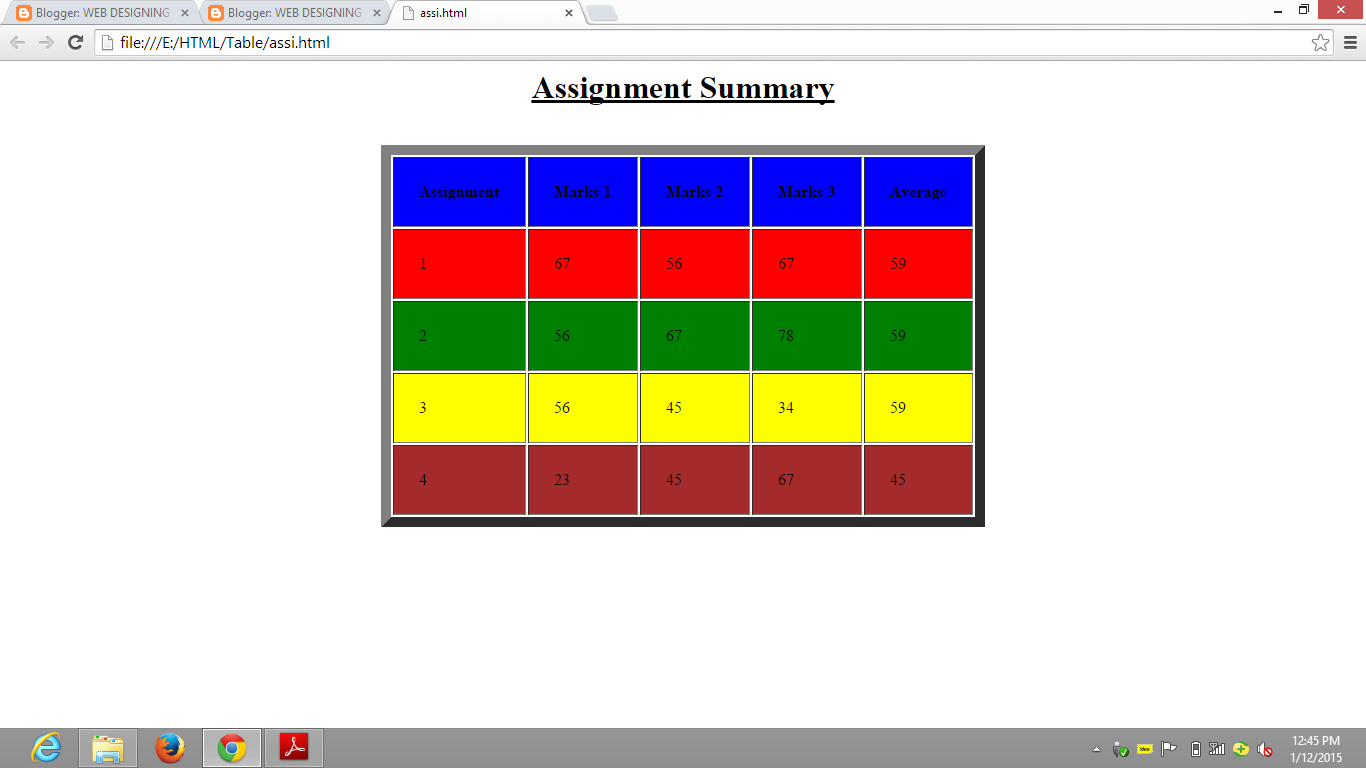
EXAMPLE OF A BASIC TABLE:


<html>

<head>
</head>
<body>
  <center><h1><u><b>Assignment Summary</b></u></h1><br>
    <Table border=10 cellspacing =2 cellpadding=25>
      <TR bgcolor=blue>
   <TH>Assignment
   <TH>Marks 1
   <TH>Marks 2
   <TH>Marks 3
   <TH>Average
      <TR bgcolor=red>
    <TD>1
     <TD>67
     <TD>56
     <TD>67
     <TD>59
    </TR>
       <TR bgcolor=green>
     <TD>2
     <TD>56
     <TD>67
     <TD>78
     <TD>59
     </TR>
   <TR bgcolor=yellow>
      <TD>3 
    <TD>56
      <TD>45
     <TD>34
     <TD>59
    </TR>
   <TR bgcolor=brown>
      <TD>4
      <TD>23
      <TD>45
      <TD>67
       <TD>45
    </TR>
   </center>


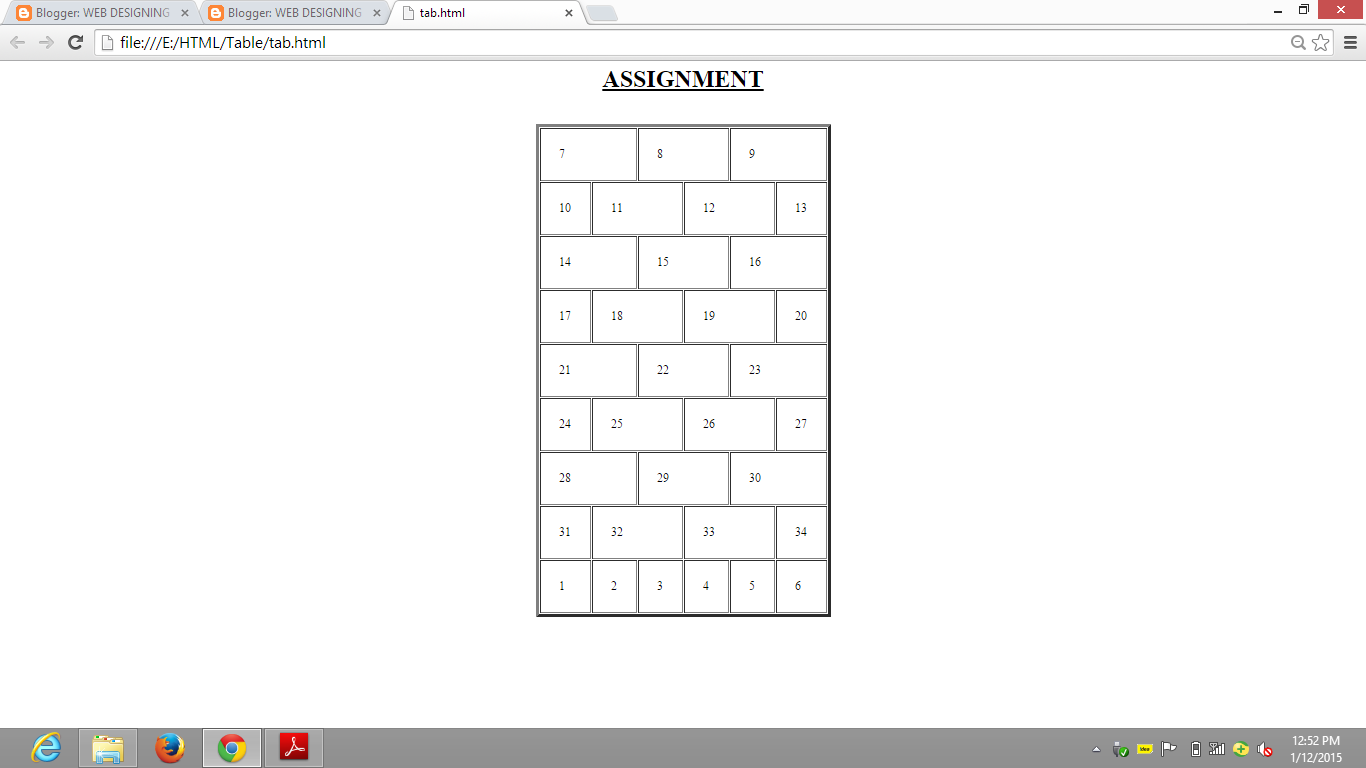
ANOTHER EXAMPLE:
Using colspan method to make a table,


<html>

<head>
</head>
<body>
 <center><h1><b><u>ASSIGNMENT</u></b></h1><br>
  <table border=5 cellpadding=25>
    
     <tr>
       <td colspan=2>7
        <td colspan=2>8
        <td colspan=2>9
    </tr>
   <tr>
     <td>10
     <td colspan=2>11
     <td colspan=2>12
     <td>13
   </tr>
  
    <tr>
      <td colspan=2>14
      <td colspan=2>15
       <td colspan=2>16
  </tr>
    
     <tr>
      <td>17
      <td colspan=2>18
      <td colspan=2>19
     <td>20
   </tr>

   <tr>
       <td colspan=2>21
      <td colspan=2>22
     <td colspan=2>23
   </tr>

     <tr>
        <td>24
         <td colspan=2>25
        <td colspan=2>26
       <td>27
    </tr>
  
     <tr> 
       <td colspan=2>28
       <td colspan=2>29
       <td colspan=2>30
     </tr>

      <tr>
      <td>31
      <td colspan=2>32
      <td colspan=2>33
      <td>34
    </tr>
<tr>
       <td>1 
       <td>2
        <td>3
        <td>4
         <td>5
        <td>6
    </tr>
</body>
</html>


<html>

<head>
</head>
<body>
 <center><h1><b><u>ASSIGNMENT</u></b></h1><br>
  <table border=5 cellpadding=25>
  
   <tr>
    <td colspan=2>1
    <td colspan=2>2
     <td>3
    </tr>

     <tr>
       <td colspan=3>4
       <td colspan=2>5
    </tr>
    
     <tr>
       <td colspan=2>6
       <td colspan=3>7
     </tr>

     <tr>
       <td colspan=5><center><b>BREAK</b></center>
     </tr>

      <tr>
        <td colspan=2>8
        <td colspan=2>9
        <td>10
    </tr>

      <tr>
       <td colspan=5><center><b>BREAK</b></center>
     </tr>

    <tr>  
    <td>11
      <td>12
      <td>13
      <td>14
      <td>15
   </tr>

</body>
</html> 
    

 For ANY Queries, CONTACT ME at prankurbadhani@gmail.com